Organizations & Shared Vaults
Organizations are a great way to organize, manage and share data between Padloc users. Use cases range from simple family accounts to teams, companies or any other kind of institution or group that has the need store store and share sensitive information between multiple people. Using organizations, you have fine-grained control of who can access, edit and share certain information. Padloc achieves this without requiring you to explicitly trust our servers, your network provider or anyone who might be listening in on the connection. If you want to learn more about how we make sure that your data is only visible to the people it is meant for, check out our security white-paper.
Creating an organization
To create an organization, click the button in the main menu. You'll be given the option between the Family, Team and Business plans, which vary in a few key aspects. For demonstration purposes we'll be choosing the Team plan. Pick whatever plans seems right for you and don't worry, all plans have a 30 day trial period so you can give it a test ride without having to pay anything.

Upon successfully upgrading to the Family, Team or Business plan, Padloc will automatically create the organization for you, which should show up in the main menu as "Family", "My Team" or "My Business", depending on which plan you chose. If it doesn't show up right away, try clicking the button at the bottom of the main menu.
Don't worry, you're not stuck with the default organization name! You can change it anytime in the organization settings!
Members
Organization Members are verified Padloc users that can be assigned to Groups and given access to shared Vaults. You can view and manage your organization's members in the Members Page, which you can get to by clicking on the organization name in the main menu (right below "Organizations"), then selecting .
Roles
There are three different roles members can fill in an organization.
- The owner is the user who created the organization and is the only one who can add, suspend and un-suspend members, appoint admins and change the organization's settings.
- Admins can create groups and vaults and assign read and write permissions for vaults.
- Regular members don't have any permissions other than the read and write permissions assigned to them for specific vaults either directly or through groups.
Adding New Members
Adding a new member is a multi-step process establishing a cryptographic handshake that will allow both the new member and the organization to verify each others identities and safely encrypt data in a way that will allow all all authorized parties to access it simultaneously.
Note: You have to be the organization's owner to add or remove members.
Step 1: Send Invite
Before you can add a person to your organization, you have to send them an invite first. The invite will be sent by email, and accepting it will require a confirmation code (more about that below).
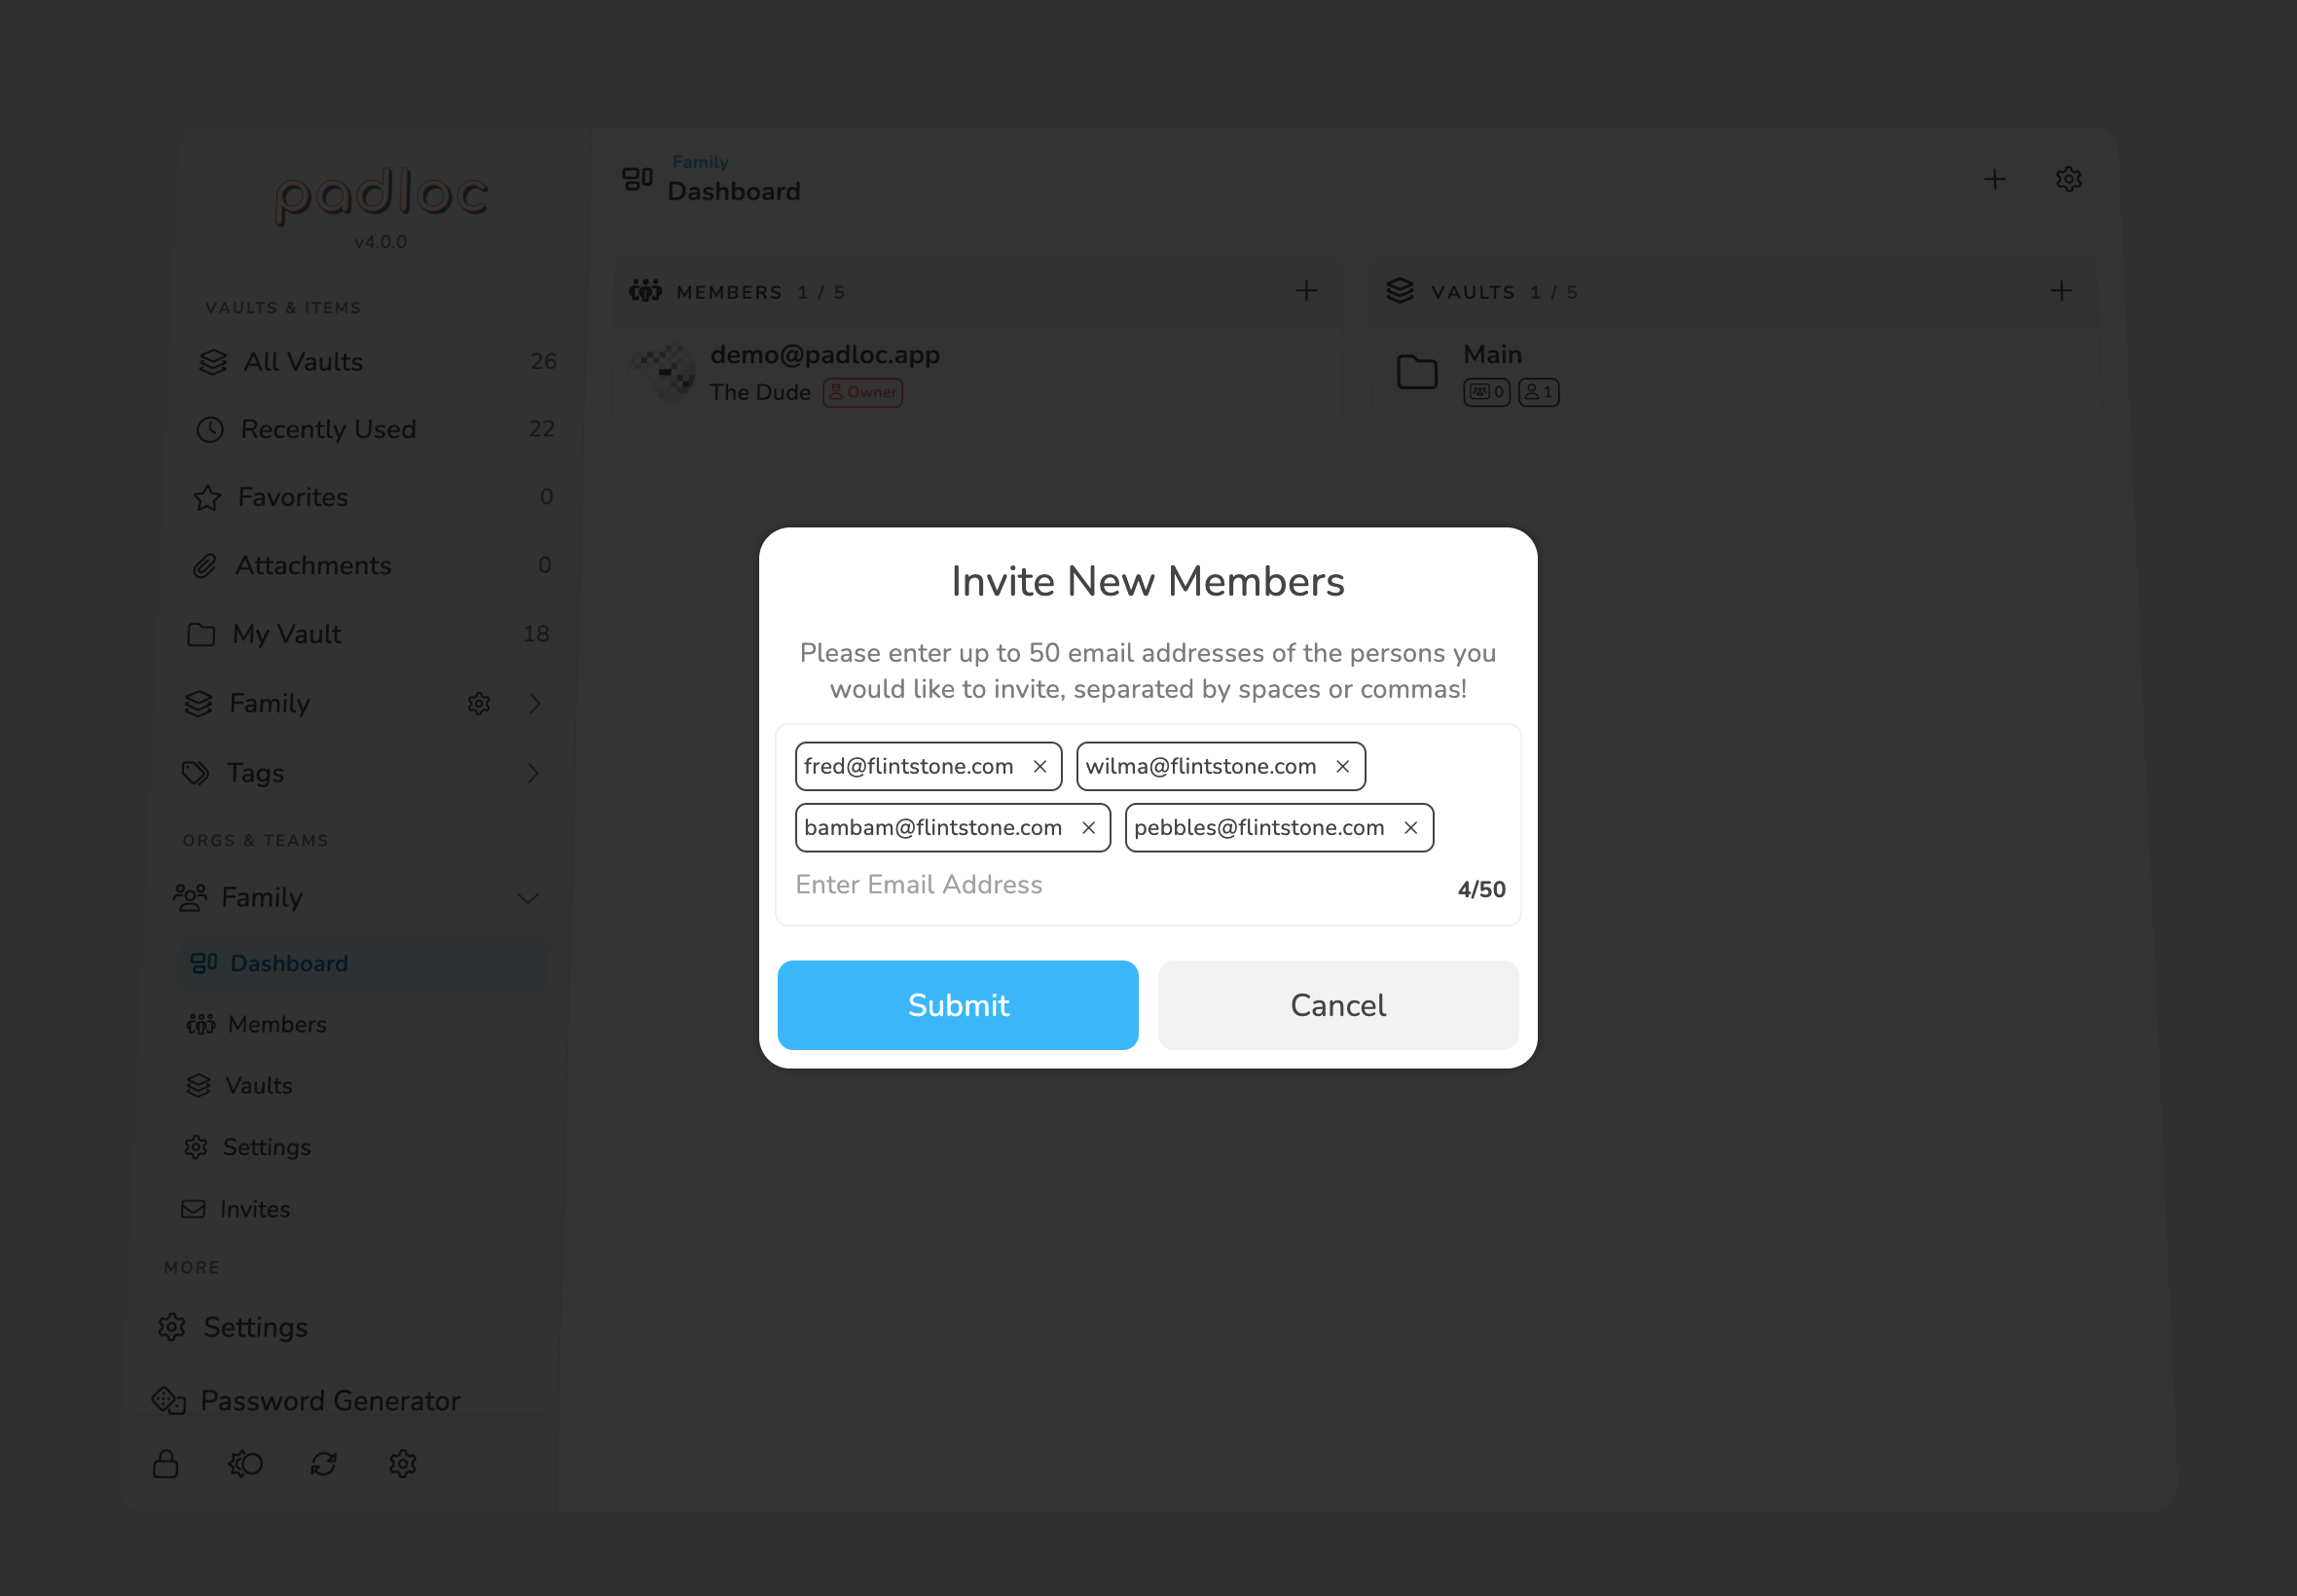
To send an invite to join your organization, first go the the page, then click on the button in the top.
You'll be presented with a dialog where you can now enter the email address of the person you'd like to invite. To invite multiple people at once, type in all their email address, separated by a comma or space.
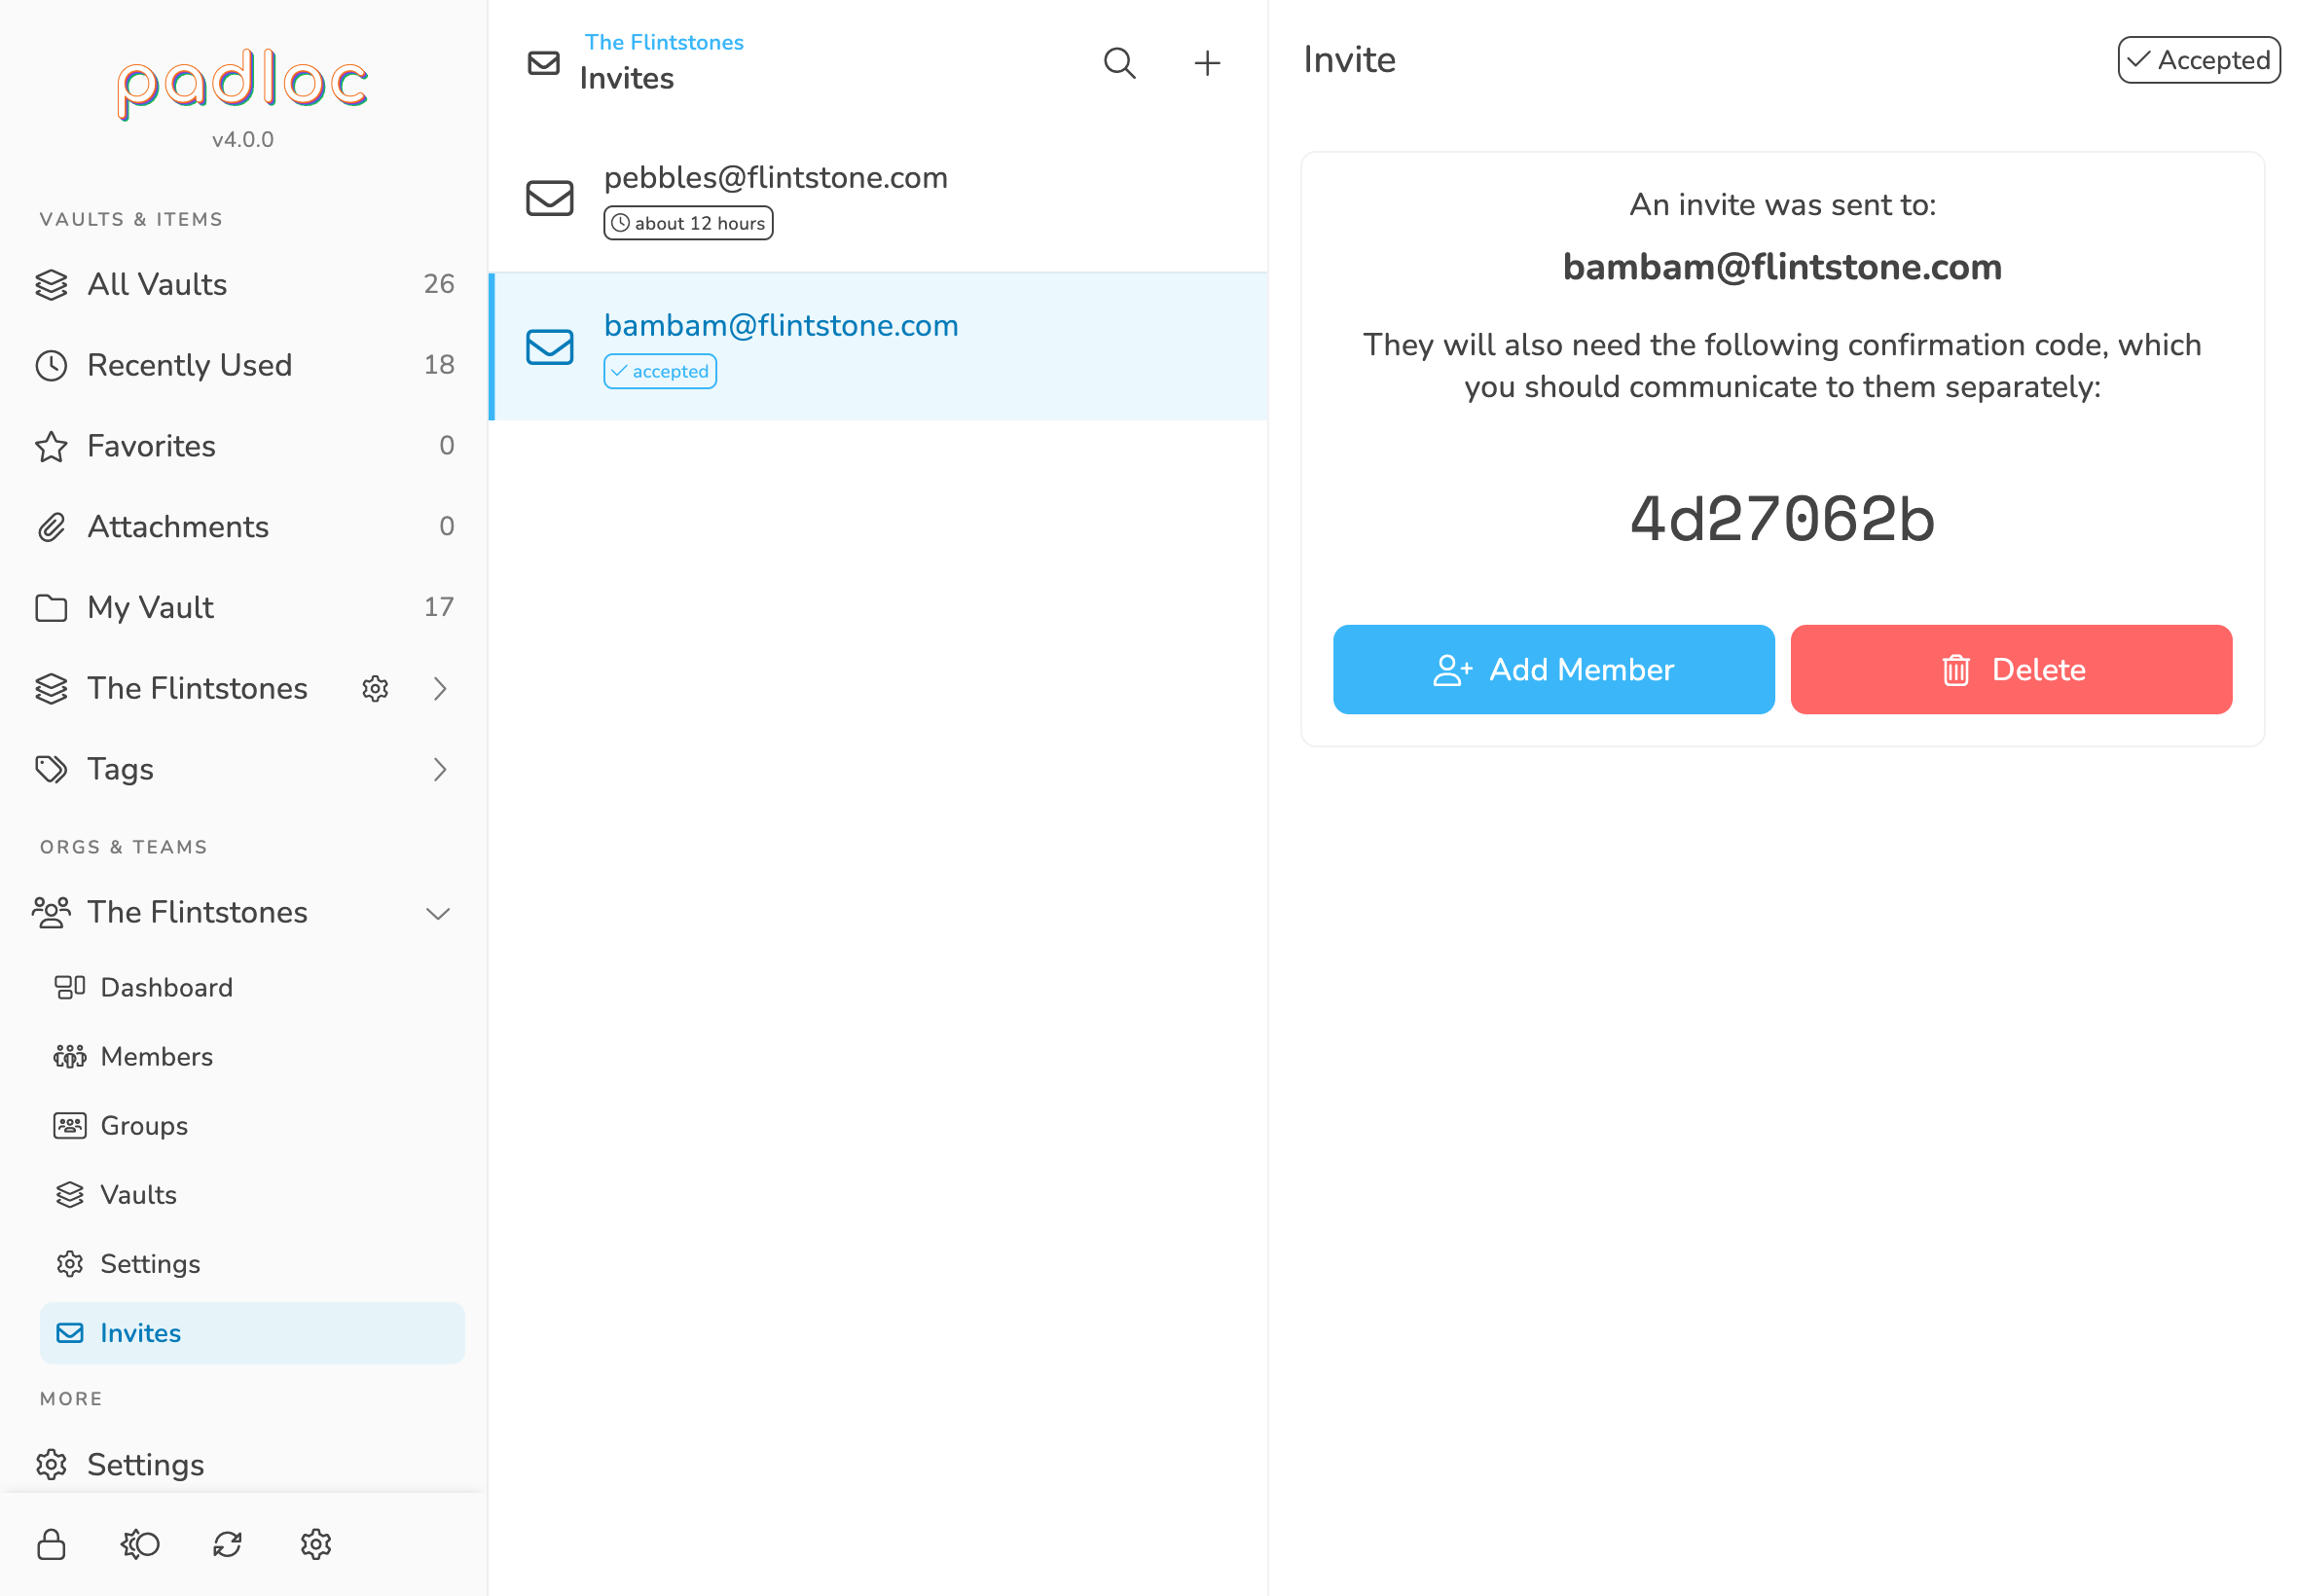
Once you've created an invite, it will show up under . Select the invite to view the invite status and, most importantly, the confirmation code. Each invite comes with unique confirmation code that the invitee will have to enter correctly in order to accept the invite, so make sure to inform them of their code via text message, phone call or in person.
As a security precaution, invites are only valid for 12 hours so make sure you complete the process before then.

Step 2: Accept The Invite
The recipient of the invite will receive an email asking them to accept the invite. Following the embedded link will bring up a confirmation dialog. (If they don't have a Padloc account yet, they'll have to go through the signup process first).
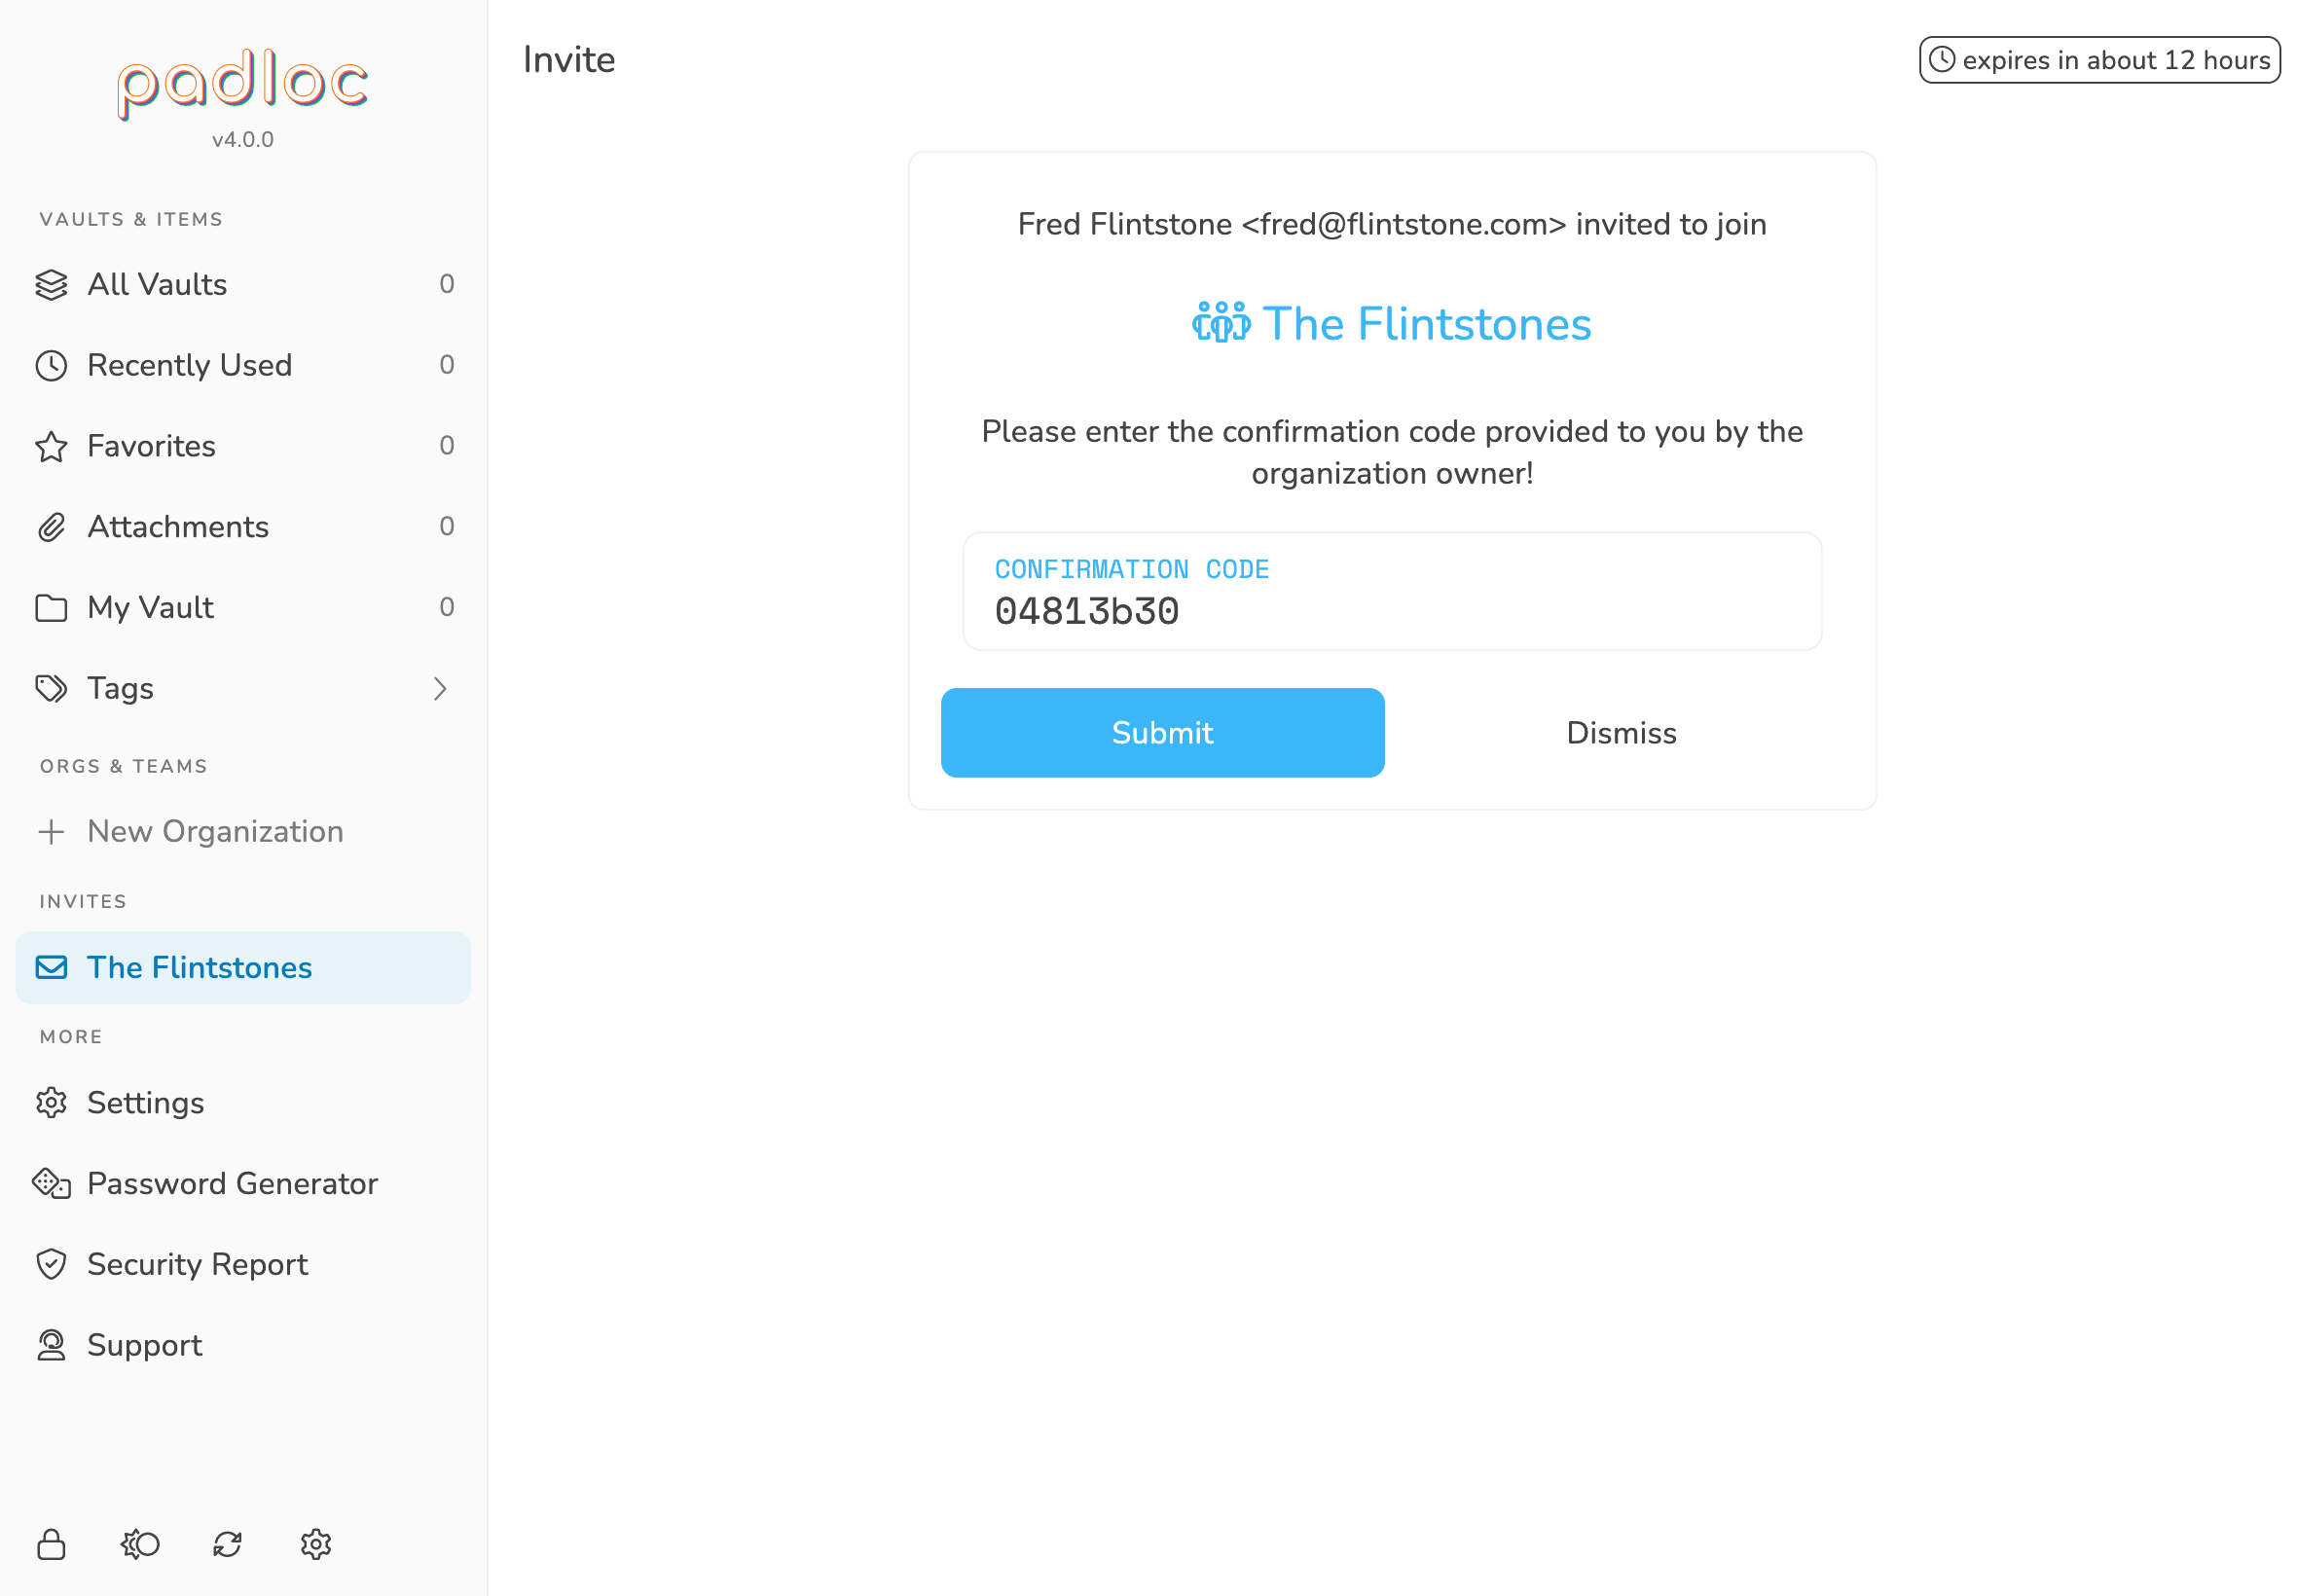
At this point they will have to enter a confirmation code, which is the same alphanumeric code displayed on your end. As mentioned before, organizations and shared vaults are designed in a way that do not require explicitly trusting whoever is hosting the server (in this case, us). The confirmation code plays an important part in this as it is never send to the server in plain text and is only visible to the organization owner, who has to communicate this code to the invitee directly. We recommend using a channel other than email, like a text message, in person or by phone, but how you do this is up to you.
Step 3: Confirm Membership
Once they have entered the correct code and accepted the invite, you'll be notified by email. All that is left to do then is to confirm their membership! In order to do that, go to the page, then click .
Step 4: Adjust Role and Permissions
You've successfully added a new member to your organization, but they won't have access to any vaults yet. You can now add them to Groups, give them permissions to access certain Vaults or adjust their role.
Deleting Members
To delete an organization member, select them from the list in the page, then click the button in the top right and select .
When a Padloc user is removed from an organization, they automatically lose access to all of the organization's vaults.
Even after removing access to a vault, the data may still be stored offline on on some of their devices and there is now way to be sure they haven't copied some of the data in some other way, so may want to take measures to account for this, like changing any passwords they had access to.
Suspending and Un-suspending Members
Suspended members retain their assigned permissions and group memberships but can no longer utilize their permissions, meaning they will not receive any updates to vault data or be able to make any changes themselves.
You can suspend an organization member by selecting them from the list in the page, then clicking the button in the top right and selecting .
To un-suspend a member, simply select from the same menu. You will then have to reconfirm their membership by undergoing the same process you did when a adding them.
Members will automatically be suspended if they recover their account after losing their master password or when the organization's cryptographic keys are rotated, in which case all organization members will be suspended except the organization owner.
Make Someone an Admin
To make someone an admin, first select an organization member by selecting them from the list in the page, then click the button in the top right and select .
To remove someones admin privileges, simply select from the same menu.
Transfer Ownership
To transfer ownership to a another user, first select an organization member by selecting them from the list in the page, then click the button in the top right and select . Your own role will be changed to Admin.
Please note: Transferring organization ownership does not transfer any billing information. Instead, the previous owners' plan will automatically downgraded to Premium and the organization will be frozen until the new owner upgrades to the appropriate plan.
Vaults
As mentioned in the previous article, Vaults are like secure folders that can hold a number of data entries, or "Vault Items". However unlike your personal Vault, an organization's Vaults are designed to share information between multiple Padloc users!
By default every organization comes with a Main vault. This vault is merely created for your convenience and doesn't serve any special purpose, but it may be a good place to store data all or most of your organization's members should have access to. You can add more vaults to organize your data into more specific segments for more fine-grained control over who has access to what data. For example you could have a vault that contains all your finance and accounting related data, one with all your social media accounts and so on.
You can view and manage your organization's vaults in the Vaults Page, which you can get to by clicking on the organization name in the main menu (right below "Organizations"), then selecting .
Creating Vaults
To create a new vault, navigate to the page and click button on the top.
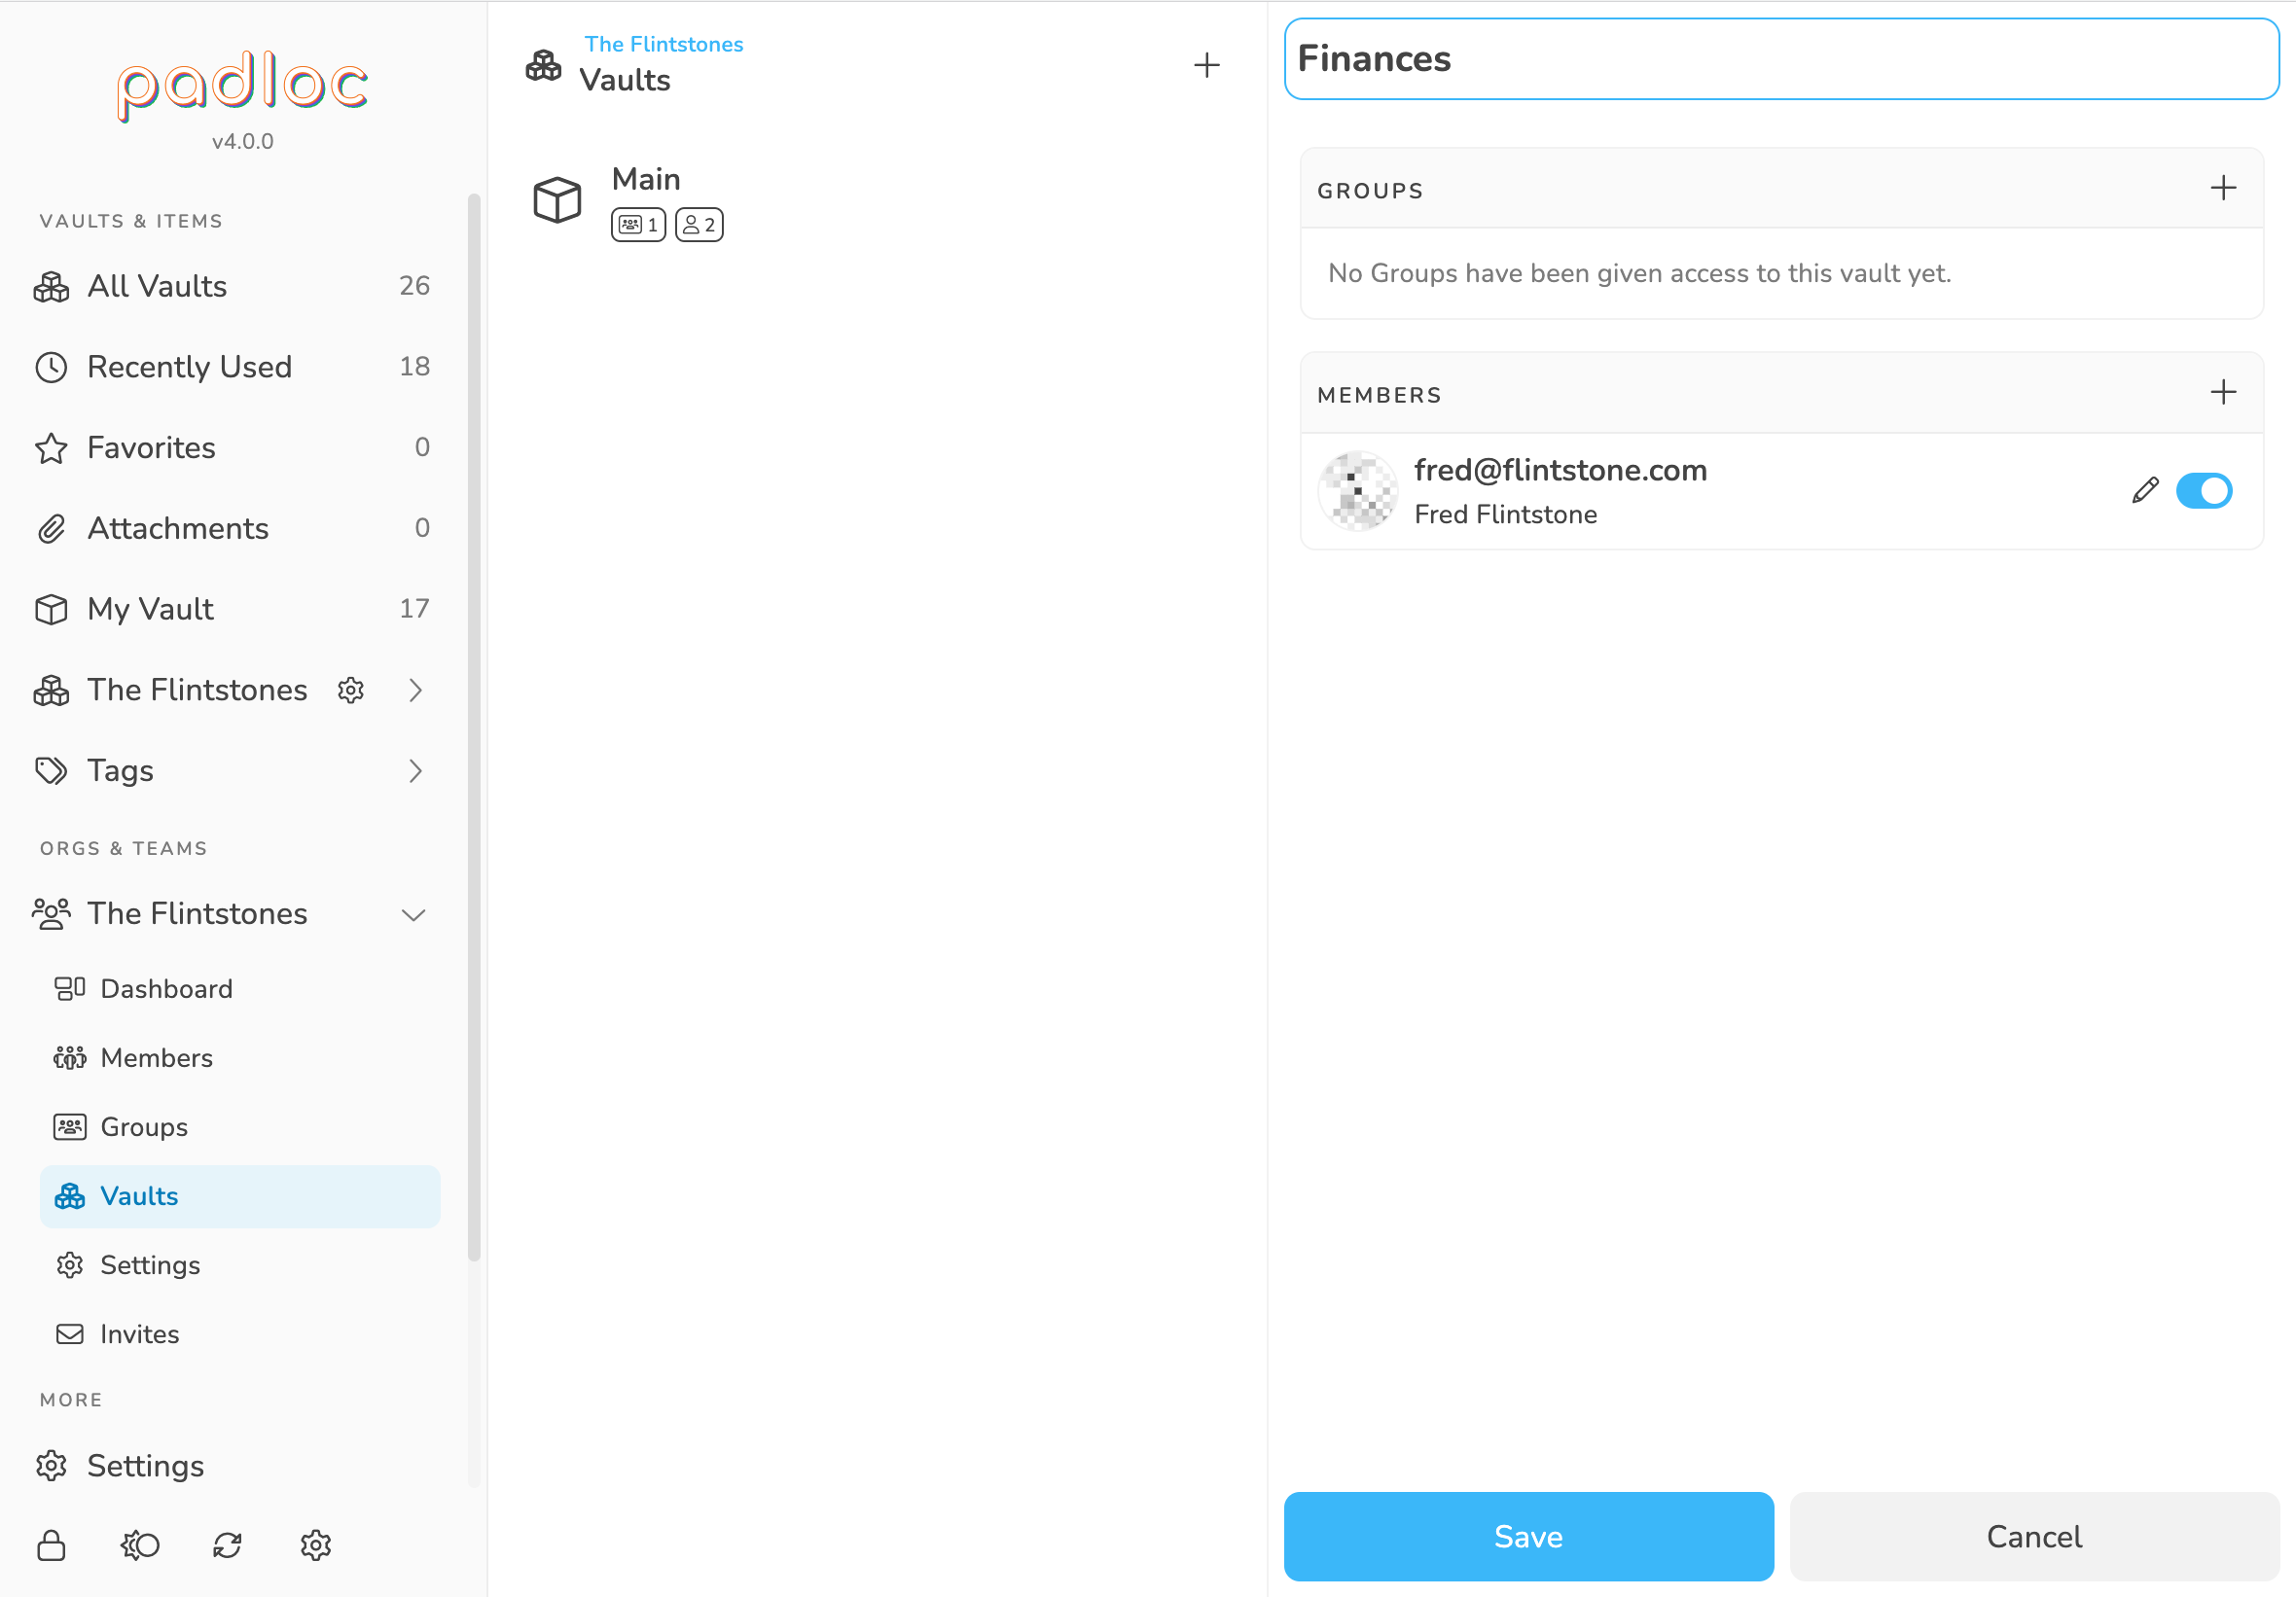
Enter the name of your new vault in the input on the top. You can also define who can read and/or edit vault data by assigning permissions to organization members directly or indirectly through groups (more about this in the Managing Access section). To add the vault to your organization, click .
Editing Vaults
You can edit an existing Vault by selecting it from the page and simply making the desired changes. Don't forget to hit to save your changes!
Deleting Vaults
To delete a Vault, go to the page and select the desired Vault from the list. Then click the button and select . You'll have to confirm you choice by entering the word "DELETE" and hitting .
Warning: Deleting Vaults is permanent, and destroys all data saved within.
Managing Access
Organizations have a simple yet powerful permissions system that allows you to define who can read, edit and manage vaults. Read and write permissions can be assigned to members directly or indirectly through groups.
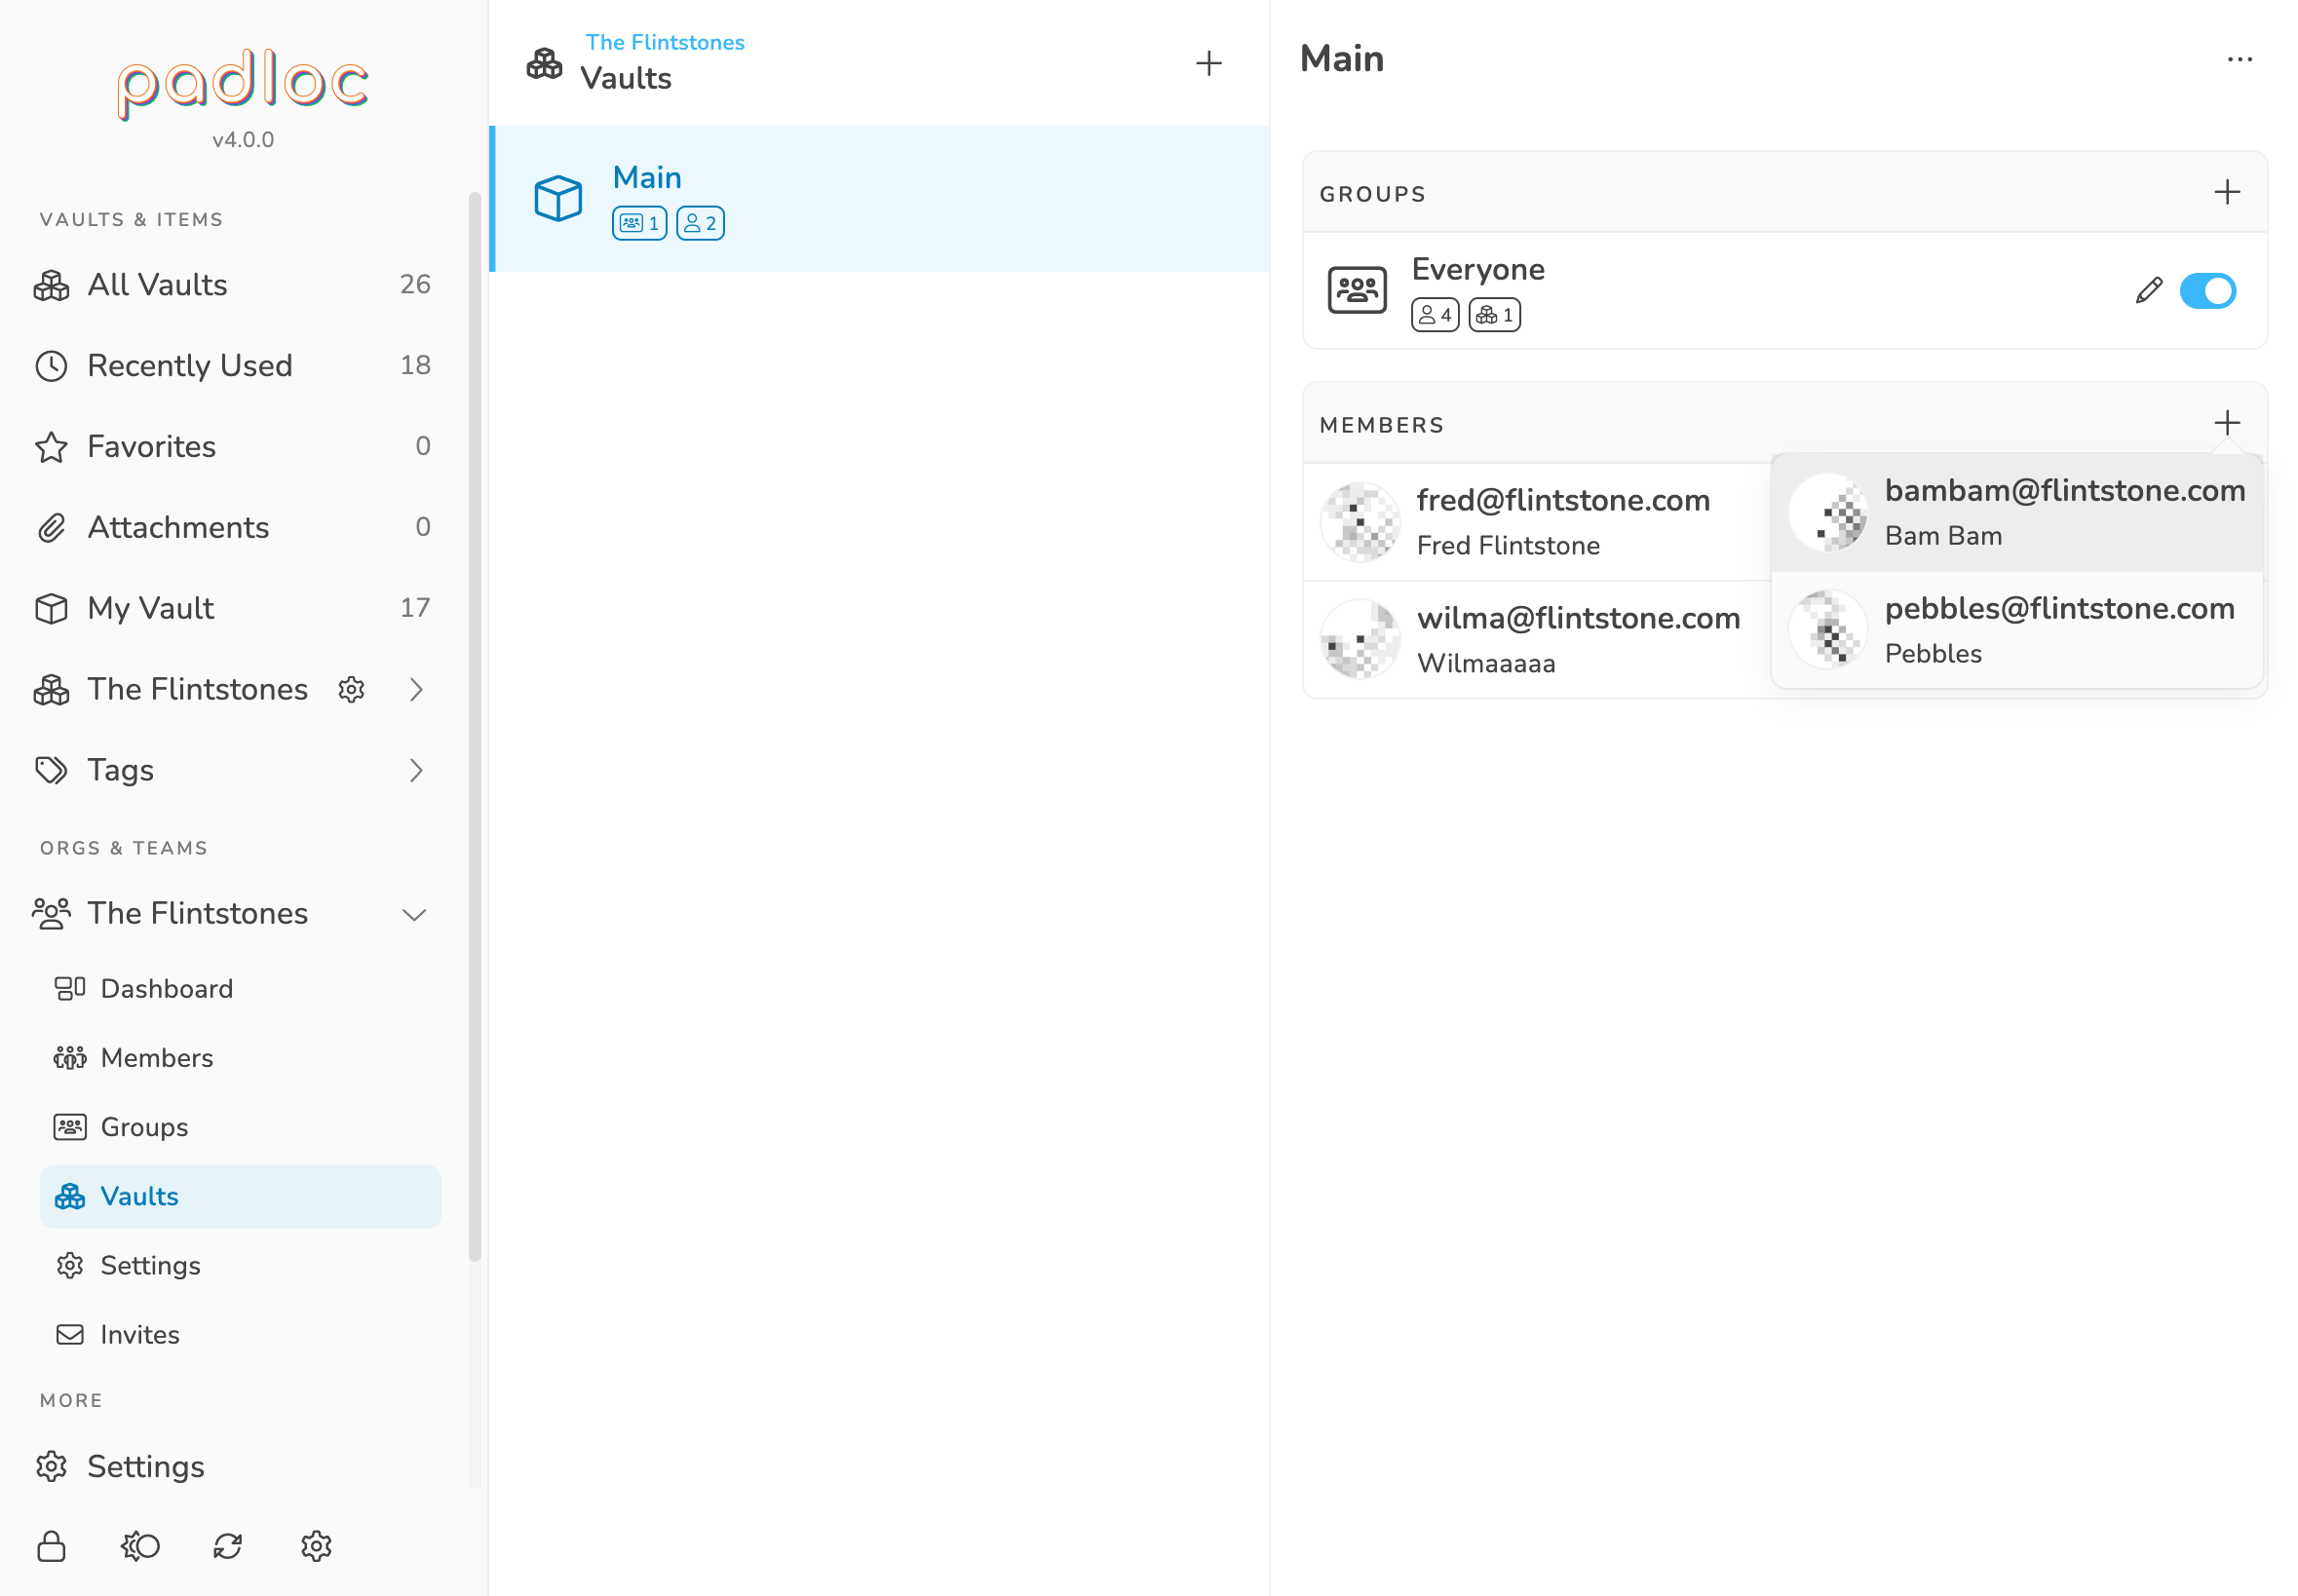
Assigning Individual Members
One way to grant a member access to a given vault is to assign them individually. To do this, first select the desired vault from the page, then click the button in the top right corner of the box labeled "Members". After you've added them, you can also decide whether you want to give them write access by toggling the button on (write access) or off (read-only).
To remove a member's access to a Vault, move your mouse over them (or tap on them if you're on mobile) and click the button.
Don't forget to hit to save your changes!
Assigning Groups
Assigning Vault access to each organization member individually might work well for small organizations, but for organizations with many members, Groups are a more efficient way to manage permissions.
Adding Groups to a Vault works exactly the same as assigning individual members. Simply click the button in the top right corner of the box labeled "Groups". Same as with individual members, Groups can have write or read-only access, which you can determine by toggling the button on (write access) or off (read-only).
To remove a Groups's access to a Vault, move your mouse over it (or tap on it if you're on mobile) and click the button.
Don't forget to hit to save your changes!
Groups
Groups are a great way to organize your company or team into certain segments based on their job description, level of clearance or any other criteria you may come up with. For example, your groups could reflect the departments in your company, like Management, Accounting, Engineering etc, but how you use them is ultimately up to you.
Note: This feature is only available in the Team and Business plans.
Just like regular organization members, groups can be assigned read and write permissions to a certain subset of the organization's vaults, which are then transferred to all of the members within the group. Vault permissions are additive, which means that an organization member has the read or write permission to a certain vault if they are part of any group that has that permission or that permission is assigned to them directly (see Managing Access).
By default, every organization comes with the Everyone group. This group is merely created for your convenience and doesn't serve any special purpose. Feel free to repurpose or delete it.
You can view and manage your organization's Groups in the Groups Page, which you can get to by clicking on the organization name in the main menu (right below "Organizations"), then selecting .
Creating Groups
To create a new Group, go to the page and click the button on the top. now you can enter the group's name select the which organization members should be part of this group.
Here you can also define which Vaults this group should have access to. This works exactly the same way as described here, only in reverse.
Click to create the new Group.
Editing Groups
You can edit an existing Group by selecting it from the page and simply making the desired changes. Don't forget to hit to save your changes!
Deleting Groups
To delete a Group, go to the page and select the desired Group from the list. Then click the button and select .
Duplicating Groups
Sometimes you may want to create a new Group that is similar to an existing Group, but with only a few changes. In this case it might be quicker to duplicate a Group instead of creating a completely new one.
To duplicate a Group, go to the page and select the desired Group from the list. Then click the button and select . This will create a new Group with the same assigned Members and Vaults. You'll be taken straight to the duplicate group where you can now make your adjustments.
Renaming Your Organization
To change your organization's name, navigate to the organization's page and click the button labeled . Then simply enter the new name and click .
Rotating Cryptographic Keys
When you create an organization, Padloc will generate a set of cryptographic keys that are used for signing and verifying the identity of its members. These keys are protected by a strong encryption scheme and only accessible to the organization owner (this is why only the owner can invite and add members).
To ensure the integrity of the cryptographic contracts that protect all communication between organization members, it is important that these keys remain secret to anyone but the organization owner. Should you as the organization owner have any reason to believe that your Padloc account may have been compromised in any way, you can generate a new set of keys via the option in the organization's page.
After rotating your organization's cryptographic keys, all the organization's members except the owner will be suspended and will have to be reconfirmed (see Suspending and Un-suspending Members).
Deleting An Organization
Note: Deleting an organization will not delete the accounts of its members - they will merely loose access to all data owned by it. The private vaults of the organization's members are also not affected.
To delete an organization, click the button labeled at the very bottom of the settings tab, then type out the word "DELETE" to confirm your choice.
Warning: Deleting an organization will cancel any active subscriptions and permanently erase all the organization's data from Padloc, including all shared vaults owned by it. **This action is not reversible!**